
The major milestones are:
- Design the Area
- Excavate the Area
- Construct a Border
- Refill with Good Soil
- Plant the Flowers
- Cover with Mulch
Required Tools
- Work Shoes - At several points it stormed and flooded my half-dug bed. After working for just 15 minutes I would have 2 inches of mud on the bottom. Be prepared to throw away your shoes or be stuck with permanent junk shoes.

- Work Gloves - This pair is actually the 2nd that I used. The first pair is in the trash. I wore through all 10 fingers on the first set.

- Large Spade - This is the best way to get soil up. I tried a shovel and had no luck. This worked especially well with the black clay that we have.

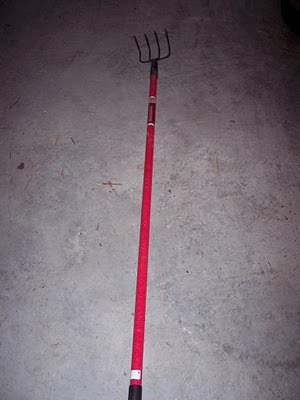
- Whatever This Is - Yup, I have no idea what to call it, but it is the best tool for clearing out defined areas. I used it dig out the outline for the bed before I started.

- Spreader - I used this to spread out the new soil evenly throughout the bed.
- Small Spade - Most people have this already. You dig holes for the bulbs and flowers with it.

- Heavy Duty Cart - Now I did not have this wonderful contraption for most of the project. For the first 40 or so bags, I just manually carried them to their locations. This will save your back when hauling a lot of soil.


Now you may ask why I am going to all this trouble. Well that is because I have lots of Black Texas Clay underneath my yard. It has the nickname of "Black Gumbo". It soaks up water and swells. This is one of the reasons that so many people have foundation problems in our area of North Texas. Most plants need "Well Drained Soil" which is pretty much the opposite of what I have. So I replaced it. I ended up digging up only about 1 - 1.5 feet down. Others have done more, but I frankly got tired of digging. Here is what I replaced it with:
- Peat Moss - 10 Bags

- Top Soil - 20 Bags

- Manure - 10 Bags of the cheap stuff. They have premium manure... but I can't imagine what that means.

- Compost - 10 Bags
- Top Soil - 20 Bags
- Mulch - 12 Bags


So let's take a look at those milestones again.
- Design the Area - This is probably the most important step. This allows you to put in a lot of effort without having to redo things. My wife gave in to my pleadings and helped measure the back yard space beforehand. The map came out like this:
 I went online and printed off a grid and then with help of a ruler hand drew the dimensions. Next, we did an initial master plan, or how we want it to look in the end. Our friends, Karson and Sharon, helped in this process. This keeps each sub-project from being vastly different and looking odd in the end. Next, we prioritized the sub-projects and focused on our first bed, outside of our bedroom. We found a plan in a landscaping book tailored to our area and used it as our base:
 This plan came from Creative Homeowner's Texas Home Landscaping book. I would highly recommend it. We then took our master plan for the backyard and fit the plants that we wanted into it. The end result looks like this:
 Sp now that you have a good plan, digging in the right spot and building a border is not a game of chance.
 - Excavate the Area - This where all the oomph comes into play. At least 50% of my time on this project was spent digging. I am estimating that I dug out about 3,000 lbs of dirt. So be prepared for this phase to go slower than you thought.
The first thing to do is to dig out the border a little bit. This allows you to be reckless inside that border with your spade. I used our hose and snaked it around into the shape that I wanted the bed to be. I then used the yet-to-be-named tool from above to strip the grass along the hose. I then removed the hose and dug a little trench and shaped the border a bit.
The rest is just good ole-fashioned hard labor. One thing that I did not consider before starting this phase was where on earth all of this dug up dirt was going to go. Luckily, the lot next door to me is empty right now. Now lifting all of that dirt over the fence was no fun, but at least it is out of my yard.
 - Construct a Border - I used two different kinds of border. We have leftover brick from the house construction and so I turned that into a decorative border:
 I had enough brick to go vertical and it looks good from the grass side. You can also see that famous black clay with the brick there. The fence did not need anything fancy, so I bought the cheap pliable plastic border from Lowes:
 Before going to the next step of refilling the area, it is a good idea to consider drainage and watering levels. I have a downspout that was pouring right into the middle of the new bed and would erode my hard work. I got a very cheap solid black tube and extended the drain out of the flower bed:
 I also had four different sprinkler heads that were designed for a lawn and not a flower bed. I found replacement heads that are gentler and used a simple female-female connector to attach them to the main line:
- Refill with Good Soil - Now is when all of those bags of 'the good stuff' comes into play. I put the good stuff in quotes because frankly anything was better than my black clay. So when I see a $20 miracle bag and a $1.85 pretty good bag, I choose the cheaper. With the number of bags that I bought, this added up to a lot of savings. I layered Peat Moss, Top Soil, Manure, Compost, and Top Soil. I had a friend recommend a combination similar to this and so far I like it. I used my spreader to evenly mix the dirt around the entire bed. Make sure at this point re-check your drainage. Make sure that it slopes away from the house for instance.In the end, my nasty soil was transformed into this:


- Plant the Flowers - This is the part that you actually planned for. This is the easiest stage. We planted a bunch of bulbs and using our nifty plan, I knew exactly where to go. This stage is fairly anti-climactic.
- Cover with Mulch - Protect your plant from moisture, bugs, and weeds with a good mulch. This last step also adds a colorful layer to the top


Hopefully this guide can help you. Feel free to post and questions or suggestions. I will be following up in the Spring and beyond with how the plants grow in and look.

11 comments:
Nice job, Jordan. I have one possible consideration for you. Your bed will absolutely thank you forever if you let the rainwater coming through the downspout dissipate into the garden. Rain water provides about 10x the good stuff plants want over irrigation water.
With all the soil amendments you added over that much square footage, you should not have too much problem with flooding the garden.
You can avoid the erosion by draining the downspout into a section of river rocks about two feet in diameter and as deep as your amended soil OR draining the downspout into the a level birdbath that will naturally dissipate the waters momentum and surround the birdbath with a few river rocks for good measure.
Love your rainwater.
Thanks for the suggestion Dusty. We have actually been looking into these Rainwater Barrels (http://www.northerntool.com/webapp/wcs/stores/servlet/product_6970_200380069_200380069) and are considering modifying the downspouts to collect in there. That might be a good way to collect and use the water without erosion. FYI, before I extended the gutter, each October rain literally dug like a 6 inch deep pothole in the bed, so I figured I had to do something.
Very nice. I'll have to remember this is here for whenever I get old enough to enjoy gardening.
You did an amazing job and documented it all so well. Very, very nice job.
Hi, recently moved to Texas. Do the native plants here thrive in river rocks landscape or do you have to use mulch?
My reasoning is that Mulch flies all over our yard due to the strong winds. River rocks or any other stone will stay in place
Many of my plants enjoy bull rock around them instead of mulch. My gardenias and roses love the warmth from the rocks. I deep water the risesybut don't bother much with the gardenia.
I am in Plano and in a similar situation, we are re doing up our entire yard. Do you have pictures of how this looks now?
Thank you so much.
Hello. Thank you for your posting. Very comprehensive and useful for me who is planning a new garden. Any chance of seeing some after photos of the plants and how the garden is going . Cheers
Ok......this will be going on for over a year now.
I'm not kidding when I say I've been on here hours on end, trying to find a FREE diy showing how to DESIGN a flwrbd!!!!!!
The plants are I've bought are STILL in the original pots they came in when I brought them home. I have spent literally $ 100.00's on perennials and have lost quite a few.
I need to find different designs to pick from, do it, get the plants outta their pots and put them in a forever home!!
Could you PLEASE tell me where to find FREE designs/layouts before the rest of my plants die.
Thank you
Hi any updated pictures to show
Post a Comment